Our Brew Blog & News
New Homebrewing Laws- What's In Them? What Can You Do? 1
The new proposed homebrew regulations are posted, and let's just say they need some work....- Theodore Clevenger
Yeast Viability- Looking at Expired Yeast 0
For a long time I've been wanting to look at yeast from various labs to see what exactly is in the package. Every lab makes claims as to cell count and viability over time. Brewing software will tell you how many cells should be in a pack after x amount of time, and then nearly every brewer has some anecdotal opinion regarding the same, but how accurate is any of this? Since, for example, White Labs developed the PurePitch packaging for yeast, these estimations are no longer accurate for this lab. They have extended the best by date on their packs from 4 months from date of manufacture to 6 months, citing better yeast health and viability as the reason. Additionally, the membranes are specially designed to allow CO2 buildup to diffuse out instead of putting excess pressure on the yeast. The supposed result is that even after 6 months, the yeast is still at approximately 70% viability! That's insane for liquid yeast. This all sounds great, but do any of these claims hold up?
As I'd been thinking heavily about all of this, I found that I had two packs of expired yeast from two different labs- Wyeast and White Labs. Not only that, but they had the same manufacture date- August 16th, 2017, which was 7.5 months old. According to brewers' opinions and brewing calculators, all of the yeast should be dead in these packs. According to White Labs, their pack should still be at somewhere north of 50% viable. It should be noted that these were different strains of yeast used in this exercise- Wyeast 2565 Kolsch and WLP351 Bavarian Weizen.


I contacted Tom Micelli at Whistle Hop Brewing in Fairview, NC to see if he'd be interested in looking at yeast with me. I hoped the answer would be Yes, as it was his lab I needed to use! Tom was thrilled to geek out on cells, so we got together to plate and scope the yeast. The results were absolutely shocking to both of us.

Measuring out yeast slurry.

Prepping the methylene violet solution.

Adding the dye to the diluted slurry before plating.

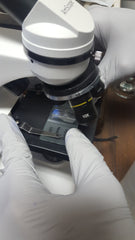
Injecting the dyed yeast into the hemocytometer.

In the last image, we've got the microscope adjusted over the hemocytometer and we're counting the dead cells. Living cells are able to metabolize the dye and excrete it, so they look clear. Dead cells, on the other hand, are dead and cannot metabolize anything, so they absorb the dye.
Tom's program allows us to count the number of cells in each grid block, which then gives us a total cell count per mL. This, however, is not that useful if all of your yeast is dead, so we then count the dead cells in the blocks, enter those figures, and the magic of software presents us with total viability (viability being the percentage of living cells in a sample). With that, we can then know how much yeast slurry to pitch in any given beer.
The results?
Here is an expanded view of the Wyeast sample (A) and White Labs sample (B)
(A)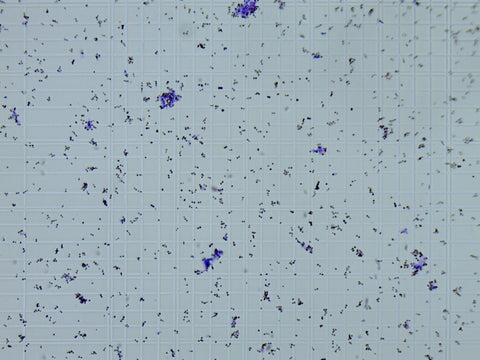
and here's
(B)
It's immediately apparent that the Wyeast is mostly dead, whereas the White Labs appears to be mostly alive. Now let's look at a couple zoomed in images from our actual cell counting. Again, image (A) is Wyeast and (B) is White Labs.
(A)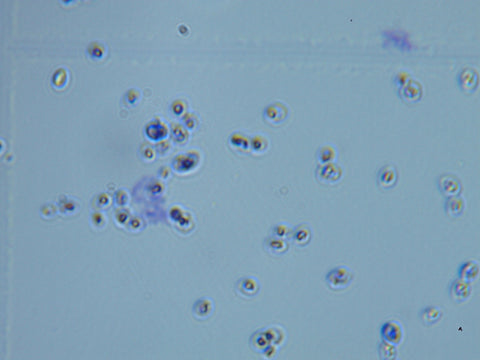
and then
(B)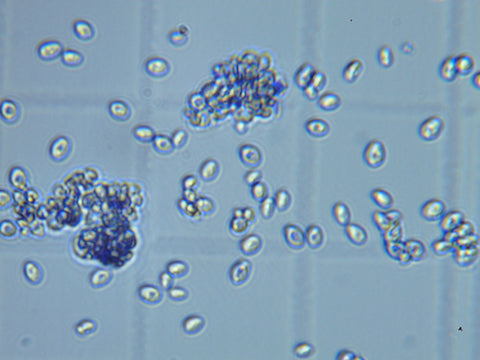
See the difference!? The Wyeast has only a few living cells, whereas it was difficult to find dead ones on the White Labs plate. On the latter plate, we could even see cells moving around and some budding occurring! No such activity was witnessed on the Wyeast plate.
Now if you're wondering about the clumps, some clumping is normal and doesn't factor into the cell counts. You can see in the expanded view that both samples had some clumps. When counting, you try to avoid excessively clumped areas since it's hard to count the cells present, let alone tell if the cells are alive or dead. In the zoomed in White Labs image, the clumps were not counted, though even they look largely alive.
So even from a cursory glance, we could tell which lab's yeast was more viable, but the question was how viable. Viability is what matters at the end of the day, not whether a lab says there are 100 billion cells or 200 billion if you don't know how many are dead. After doing our counts, the computer gave us the results:
Wyeast was 4% viable
White Labs was 92% viable
This was what was to be expected from Wyeast, but the White Labs figure was truly shocking. I can now say with total confidence that a pack of White Labs yeast that is at or even beyond its best by date is still very pitchable. It's also very easy to go to the White Labs website look up the exact cell count on any pack of yeast using the lot number printed on the package. So if your yeast is at the best by date (6 months old), you can look up the cell count at packaging and comfortably assume 70% viability as they claim. The actual viability, as we saw, may be a good deal higher however!
Cheers and happy ferments!
-Tedd
- Theodore Clevenger
Brewing With Grainfather- Tips and Ideas 1
More and more people are making the switch to electric all-grain brewing, and the Grainfather has been instrumental in making this happen. If you aren't familiar with it, the Grainfather is a stainless all-in-one brew system with a pump, digital controller (now with Bluetooth!), and counterflow chiller. The one thing you need to add to this all-in-one, is a way to sparge. You can heat up water in your old brew kettle for this purpose, or there's a Grainfather Sparge Water Heater unit that can electrically heat up to 4.8 gallons of sparge water.
Like any brew system, the Grainfather has its own quirks, idiosyncrasies, and system numbers that you need to figure out. I was an early adopter of the Grainfather, purchasing one here at the shop as soon as it was available. At the time, both Beersmith and the Grainfather calculators failed to give me the water volume numbers I really needed to be consistent; it took several brews before I got it dialed in. Before diving into water specifics, let me go over what I see as the pros and cons of this system.
Pros:
- It is compact, so it's easy to take to a friend's home for a brew day and it stores well, even in homes with little space to spare.
- It's all 304 stainless, so there's no concern of extracting off flavors or chemical compounds from other materials such as plastic.
- Conserve water. The mash basket fully drains into the kettle once lifted out, so you have zero loss from dead space (as is in the bottom of a traditional false bottomed mashtun).
- Digital temp control is great for step mashes and single infusions. The new Connect controller features bluetooth and a more sophisticated PID for even more control. You can even set the Grainfather to start at a certain time so that by the time you get out of bed, your water is at mash temp and you're ready to dough in.
- The magnetic drive pump works very well both for recirculating during the mash and for running the wort through the very efficient counterflow chiller. Both of these items also make it easy to drop temp below 180F and make whirlpool hop additions.
- U.S. version uses 120V power, so you don't need to have 240V power wired in.
Cons:
- U.S. version uses 120V power, so the max output on the heating element is 1600W, as opposed to 2000W for the AUS/NZ/UK model. This means it is not quite as fast/powerful as one might hope, especially if you're used to ramping up quickly with a propane burner.
- The pump filter clogs easily with protein and hop material, causing a slow transfer through the chiller and into the fermentor.
Fortunately, when it comes to the weaknesses of this system, you have solutions to largely mitigate these problems. Using the Graincoat, a custom-tailored insulated jacket for the Grainfather, is a tremendous help in retaining heat; this helps compensate for the "underpowered" element and maintain mash temps as well as heat water and wort more quickly. I will not use my Grainfather without the Graincoat ever again. As for the filter, using a stainless hop spider or even just a nylon strainer bag will keep the bulk of the hop material contained and the pump flowing smoothly. Boom! Easy!
Now, for the numbers. How much water do you use to mash? To sparge? What's the evaporation rate? Instead of laying this out in a clunky paragraph, here are key points that I have found and apply when preparing my recipe and going through brew day.
- Water to grist ratio: 1.6qt water per pound of grain.
- Grain Water Retention: This may vary slightly due to several factors, but in general, your grain will retain .8 fluid ounces of water per 1 oz (weight) of grain. More simply, your grain will absorb 1/4 of the water you mash in with if you're using 1.6qt/lb as I recommend.
- Evaporation rate: This really threw me off for awhile, as the evaporation rate is much lower---about half---as when I boil with propane. Again, multiple factors can affect your exact boil off rate, but it's .5-.6 gallons per hour; I typically assume .55 gallons per hour.
- Trub loss: Using a hop spider really helps maximize yield. I lose about .75 gallons to trub in the bottom of the kettle and wort left in the pump's recirculation arm. The bottom of the grainfather is dished, with the pump inlet elevated above the dish. This is nice as it allows proteins and other particulates to settle out below the intake. When I'm almost finished running the wort into the fermentor, I will sometimes tilt the Grainfather so as to pull more wort into the pump (assuming it's "clean" wort and not just protein-laden sludge).
- Sparge Water: Easily calculated once you know all the elements above and what you want your pre-boil volume to be. Allow me to walk you through how I go about making my calclulations-
EXAMPLE: I'll break this into steps to make it easier to follow.
1) I want to brew a blonde ale and end up with 5 gallons in my keg. To do this, I want 5.25 gallons of wort in my fermentor; the extra .25 is my sacrificial volume for trub.
2) I'm going to lose .75 gallons to kettle trub, so that means I actually need 6 gallons of wort post-boil.
3) This point is where there's a bit of an efficiency trade-off. Except for smaller session beers, to fully sparge your grain, you'll have a larger pre-boil volume, which means a longer boil time. You can alternatively slightly undersparge and not have to boil as long. The latter is what I do, but his sacrifices some efficiency since you're leaving more sugar behind in the grain; you can compensate for this by using more grain in your grain bill. Simply note your efficiency in your brew software so that you can adjust recipes accordingly. I opt for a 1.5 hour boil. With an evaporation rate of .55 gallons/hour, this means I'll lose .825 gallons over the course of my boil. 6 gallons post-boil plus .825 gallons evaporated = pre-boil volume of 6.825 gallons.
4) So how much do I sparge with to reach my pre-boil volume? Here we have to look at how much water I use at each stage. Let's say this blonde ale uses 10lbs of grain. To mash: 10lb x 1.6 qt water = 16 qts. Divide number of quarts by 4 to get gallons. 16/4 = 4 gallons. My grain will then absorb 1/4th of the mash water, so if I were to just drain the mash basket into the kettle, I'd then have 3 gallons in the kettle. To sparge: Preboil volume of 6.825 minus 3 gallons leaves a difference of 3.825 gallons needed to sparge. NOTE: Again, you may wish to improve your mash efficiency a bit by sparging more and boiling longer. My efficiency ranges from 75-78%. For me, a few more percentage points aren't worth an extra 30-45 minutes boil time. For session ales, more sparging typically isn't necessary since you may actually oversparge and extract tannins; it's the higher gravity beers where you really have to decide between efficiency and time.
In summary, the Grainfather is a really fun unit that does what it's supposed to and may help automate your brewing enough to where you can accomplish more on brew day. Like any system, getting to know the numbers is crucial for consistency, and I hope this guide helps you dial it in more quickly. I highly recommend investing in brewing software to help with recipe formulation and
- Theodore Clevenger